Showing posts with label holidays. Show all posts

Wednesday, April 11, 2012

Lemon Meringue Pie


This pie has been a tradition in my family for as long as I can remember. My mom doesn't even remember where she got the recipe. It's not your traditional lemon meringue pie - it has graham cracker crust and the lemon filling is more like pudding or custard. But it's still tangy & lemony & delicious!


It's a HUGE success everywhere I take it and comes out perfectly every time I make it. That's my favorite kind of recipe!


Its fancy enough for a holiday meal and easy enough for an any-day treat.


Enjoy!


Lemon Meringue Pie

Makes 1 9" pie


Graham cracker crust:

18 graham cracker squares (or 9 of the tall double-squares)

3 Tblsp white sugar

1/3 cup melted butter


Mix together with a fork in an ungreased pie plate. Press graham cracker mixture into bottom and up the sides of the pie plate. Bake at 350*F for 10 minutes. Remove from oven to cooling rack.


Lemon filling:

1 14oz can sweetened condensed milk

1/2 cup lemon juice

2 egg yolks


Blend all thoroughly and pour into baked graham cracker pie crust. Leave on cooling rack.


Meringue:

4 egg whites

1/2 tsp cream of tartar

1/2 cup white sugar


Beat egg whites & cream of tartar on HIGH until egg whites are completely shiny-white and beginning to get firm.


While still beating, slowly add white sugar, a bit at a time, to the egg whites. Continue until all the white sugar is incorporated and the egg whites are firm, shiny & totally white.


Using a spatula or spoon, gently place the whipped egg whites on top of the lemon filling in the graham cracker crust. Make sure to fully enclose the lemon filling by touching the meringue to the edges of the pie crust (not to the pie plate though). Smooth the meringue all over the pie.


Put the pie back into the 350*F oven and bake until the meringue is golden - about 15 mins.


To create the standing loops, place your spatula/spoon, flat-side down, gently against the meringue & lift up.

When the meringue is golden, remove pie from oven to a cooling rack. Cool completely before cutting.


Store pie, well-sealed, in the refrigerator for up to 2 days. You can cover it with plastic wrap or place it in a tupperware. A ziplock bag is possible is you're making an 8" pie.


NOTE:

For an 8" pie crust - use 15 graham cracker squares, 2 Tblsp white sugar, and 1/4 cup melted butter for the crust. The lemon filling & meringue recipes stay the same. An 8" pie will be much taller than a 9".


Friday, November 11, 2011

Scones - Starbucks' Pumpkin and Chocolate Chip

We're deep into hot cocoa weather here in Utah and there's nothing better with a cup of hot cocoa than a scone. Yummm!!!

The Starbucks' Pumpkin Scone recipe came from recipegirl.com, the Chocolate Chip Scone recipe was adapted by me from a few recipes I had in my recipe book. They're both amazing!

The Starbucks' Pumpkin Scone tastes just like the ones they carry at my local Starbucks, but they don't cost $4 and they're fresh from your oven. Awesome.

They only take about 10 minutes to make and about 10-15 to bake and you'll have a plate full of deliciousness - ENJOY!!


Starbucks' Pumpkin Scones
Makes 12 scones

For the scones:
2 cups all-purpose flour
7 Tblsp granulated sugar
1 Tblsp baking powder
1/2 tsp salt
1/2 tsp ground cinnamon
1/2 tsp ground nutmeg
1/4 tsp ground cloves
1/4 tsp ground ginger
6 Tblsp cold butter - must be COLD, not room temp
1/2 cup canned pumpkin - 100% pumpkin, not pumpkin pie filling
3 Tblsp half-and-half (or 2 Tblsp heavy whipping cream + 1 Tblsp milk)
1 large egg

For the powdered sugar glaze:
1 cup + 1 Tblsp powdered sugar
2 Tblsp milk

For the spiced glaze:
1 cup + 3 Tblsp powdered sugar
2 T milk
1/4 tsp ground cinnamon
1/8 tsp ground nutmeg
Pinch of ground ginger
Pinch of ground cloves

Preheat oven to 425*F. Line baking sheet with parchment paper; set aside.

Combine flour, sugar, baking powder, salt, cinnamon, nutmeg, cloves & ginger in a large bowl. Use a fork (I used a whisk & a pastry cutter) to cut the butter into the dry ingredients until the mixture is crumbly and no chunks of butter are obvious; set aside.

** This process is not immediate. Be patient & thorough. It's totally worth it! **

In a separate bowl, whisk together the pumpkin, half-and-half, and egg until thoroughly mixed. Fold wet ingredients into dry ingredients, and form the dough into a ball.

Pat out dough onto a lightly floured surface and form it into a 1-inch thick rectangle, about 3 times as long as it is wide. Use a large knife or a pizza cutter to slice the dough twice through the width, making 3 equal portions.

Cut each of the portions in an X pattern (into 4 pieces) so you end up with a total of 2 triangular pieces of dough. Place on prepared baking sheet.

Bake for 14-16 minutes, or until light brown. Remove from baking sheet to a wire rack to cool.

Mix the powdered sugar and milk together until smooth to make plain powdered sugar glaze. When scones are cool, use a brush to spread plain glaze over the top of each scone.

While powdered sugar glaze is firming on scones, combine all the ingredients for the spiced glaze. Drizzle spiced glaze over each scone. Allow icing to dry before serving (about an hour).

Enjoy!


Chocolate Chip Scones

Makes 8 scones


2 cups Bisquick - I used the Heart Healthy style

1/2 cup semisweet chocolate chips

1/3 cup heavy whipping cream + about 2 Tblsp more for brushing on scones

3 Tblsp granulated sugar

1 egg

1 tsp vanilla

Additional or decorative sugar


Preheat oven to 425*F. Spray cookie sheet with cooking spray. (I lined mine with foil first).


Stir Bisquick mix, chocolate chips, 1/3 cup whipping cream, 3 Tblsp sugar, the egg & vanilla in a medium bowl until soft dough forms. (I needed an additional teaspoon of whipping cream so my dough would stick together. You do not want this dough wet though. It is very dry & crumbly.)


Pat dough into 8-inch circle on cookie sheet. (If dough is sticky, dip fingers in Bisquick mix.) Brush circle with additional whipping cream; sprinkle with additional or decorative sugar.


Cut into 8 wedges with a long knife or pizza cutter, but do not separate.


Bake about 12 minutes or until golden brown. Carefully separate scones. If possible, serve warm.


EVEN EASIER:

Make it even easier by making drop scones. Heat oven to 400*F. Drop dough into 8 mounds onto greased cookie sheet; pat slightly to flatten. Bake 10-12 minutes or until golden brown. If making the pumpkin scones, brush & drizzle glazes after scones have cooled on a wire rack.


Monday, October 17, 2011

Spiced Pumpkin Sippers


The chill of Fall is creeping into the air these days & warm, cozy foods are on our menu. Our treats are changing too - from Summer's cool treats to the belly-warming treats of Fall. It's one of my favorite times of year!

I found this treat on The Farm Chicks' blog. I made it this weekend and it's going to be a struggle not to make it every single day! SO yummy!!

A nice change from traditional hot chocolate & so perfect for Fall!!

Enjoy!


The Farm Chicks' Spiced Pumpkin Sippers

Serves 4-6


4 cups whole milk

1 cup canned pumpkin puree

1/2 cup brown sugar, packed

1/2 tsp ground cinnamon

1/2 tsp ground nutmeg


Add all ingredients to a saucepan & whisk together thoroughly.


Whisk occasionally, over medium heat, until hot.


Ladle into mugs. Top with softly whipped cream & sprinkle with nutmeg. Serve hot.


Notes & Tips:

If you prefer a less-sweet drink, you can reduce the sugar by half.

These sippers are a great drink to serve to guests. To ease the work at party time, prepare the recipe in advance and refrigerate until ready to use.

Keep a crockpot full of the mixture to serve warm throughout your gathering.

Or, drink it one cupful at a time, simply reheating in the microwave.

Friday, July 1, 2011

Independence Day Treats - a little inspiration

When Independence Day rolls around, I think we've all made a flag cake with berries for the stars & stripes, or dyed our pancakes red & blue, or decorated sugar cookies, or made cupcakes...

Sometimes it can feel redundant. Most times, I'm looking for something new to jazz up our festivities.

This year, I found a couple of things I think you might like - a little inspiration...


These skewers are adorable! Perfect for little hands at an Independence Day party. You can find them (and more!) at Sisters Stuff.


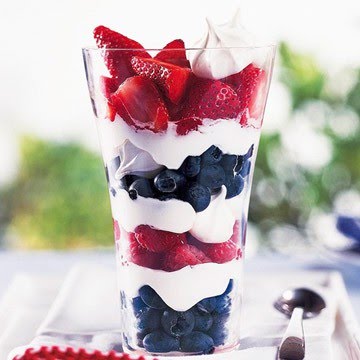
It's an oldy-but-goody, and it sure looks beautiful. I like to add granola to my fruit & yogurt parfaits. Theses are great for an Independence Day breakfast or snack. Much lighter than pancakes! (Though I do love me some pancakes!)


This one is adorable! What a great way to display breakfast muffins or cupcakes or mini-cheesecakes - anything, really.

The big splash is the topper, for me. Love another way to display a flag at the buffet table.


Finally, our traditional dessert while we watch the fireworks on Independence Day - Indoor S'mores.

They're AMAZING! :)

Happy Independence Day, everyone!

Enjoy!


Saturday, June 18, 2011

The Best Potato Salad EVER


I LOVE potato salad!! But I'm picky. I really only LOVE mine. :)


I take this recipe with me whenever we're invited to a BBQ or picnic and the host asks us to bring "a salad". The main reason I bring it - so I can eat it! But the compliments I always get are pretty nice too.


My Uncle Lee, at a family picnic, once declared this "the best potato salad EVER", so that's been the recipe's title ever since. (I happen to agree with my Uncle Lee!)

Another Potato Salad recipe from this blog that is Janis' favorite can be found here.


Enjoy!


The Best Potato Salad EVER


2 pounds (approx) red potatoes (or Yukon Gold) - washed, cubed & boiled until tender

4 hard boiled eggs, diced

1/2 cup red onion, chopped (about 1 medium onion or 1/2 large)

1 - 1 1/2 cups celery, chopped (2-4 stalks - I like more, my hubby likes less)

1 cup + 1 Tblsp. mayonnaise (not Miracle Whip!!)

1 Tblsp. white vinegar

1 Tblsp. yellow mustard

salt & pepper to taste


Place eggs in a saucepan, cover with cold water and bring to a rolling boil. Remove from heat & set aside (don't drain!), lid on, for 20 minutes. Drain, run cold water over cooked eggs for 1 minute. Move eggs to a towel or rack to cool.


Bring a large pot of water to a boil. Wash & dice about 2 lbs. red potatoes or Yukon Gold potatoes.


Dump diced potatoes into boiling water (watch out for splashes - ouch!). Cook until fork-tender. Drain & set aside to cool.


Wash & dice celery stalks. Dice red onion. Place both in a medium-sized bowl. Add mayonnaise, mustard, & vinegar.


Stir well to combine. (Cover bowl with plastic wrap & place in the refrigerator if your potatoes & eggs aren't cooled yet. You can prepare the onion/celery/mayo mixture the night before, if you want)


Dice the cooled eggs & add to cooled potatoes in a serving bowl. Sprinkle on about 1/2 tsp. pepper & 1/2 tsp. salt. (You might add it plus more later, after you've mixed everything. It's to taste so it's up to you.)


Pour celery/onion/mayo mixture over the potatoes & eggs. Mix well, until all the potatoes are covered with the mayo mixture.


Taste. (YUMM!!!) Add salt/pepper, if desired.


EAT! :)


NOTE: This is even better if it can sit in the fridge for a few hours before you serve it. You can top it with sliced hard-boiled eggs & paprika for "prettiness", but they're definitely not necessary.


Monday, May 2, 2011

Easy Potato & Bacon Breakfast Casserole (Our Best Bites)


SUPER yummm!!! Have you seen this over at Our Best Bites?!?


Perfect recipe to send to hubby to make for Mother's Day. Also a good idea for dinner on a busy day. Make it in the morning, let it sit in the fridge, & pop it in the oven at the end of the day.


I can't wait to make this - I'll let you know how it goes...


Saturday, April 16, 2011

We made the TOP 5 on "Sweet as Sugar Cookies"


We made it to the Top 5 on Sweets for a Saturday at http://sweet-as-sugar-cookies.blogspot.com/!! Woohoo!!

Hop on over there to check out some more ideas for Easter treats & some mouth-watering recipes to satisfy your sweet tooth.


Wednesday, April 13, 2011

Chocolate Chip Blondies (half whole wheat flour)


These blondies are one of our favorite treats!! The combination of butterscotch with chocolate chips plus the buttery taste is divine. I cut the recipe out of Sunset Magazine YEARS ago (maybe 9 or 10 years?) so I can't give the exact issue.

I've taken these to potlucks, given them for Christmas gifts, taken them to sick friends' families as a dinner treat, and baked them for family & friends for years - I always get the question "Can I get the recipe?!?" LOVE that!

I also like that they're made with half whole wheat flour and half all-purpose flour. Not that a bit of whole wheat flour makes up for the butter & the sugar & the butterscotch or chocolate chips, mind you. :)

I hope you enjoy these!!

Chocolate Chip Blondies

Prep & cook time: about 1.25 hours
Makes: 24 blondies

3/4 cup butter, at room temperature (softened)
3/4 cup white sugar
3/4 cup brown sugar
1 1/2 tsp vanilla
3 large eggs, lightly beaten
1 1/4 cups all-purpose flour
1 cup whole wheat flour, finely ground
1 tsp salt
1 tsp baking soda
3/4 cup butterscotch chips
3/4 cup chocolate chips
3/4 cup chopped walnuts (about 3 ozs)


  • Preheat oven to 350*F. Butter (use butter, not cooking spray, if you can) a 9x13" baking pan; set aisde.

  • In a bowl, with mixer on medium speed, beat butter, white sugar, & brown sugar until smooth. Add vanilla & eggs and beat until well blended.

  • Stir in flour, salt & baking soda until well combined.

  • Stir in butterscotch & chocolate chips and the walnuts.

  • Spread dough level in pan. (It's thick so take your time & spread it evenly)

  • Bake 30 minutes until top is browned and a wooden skewer inserted in center comes out with moist crumbs attached.

  • Cool on a rack for 15 minutes, then cut into 24 squares.


NOTE: As it cools, the center will sink a bit.


We like this warm with ice cream or a cold glass of milk, but you can serve these warm or cold.


Store in an airtight container or tightly cover your baking dish with cling wrap.

Monday, April 4, 2011

Overnight French Toast Bake with Berry Sauce


I got this recipe from Betty Crocker's "Most Requested Recipes" cookbook. It was a hit with the family so this will become a tradition for those days when we want something ready to go in the morning. A dish I can just pop in the oven, bake & serve.

The berry sauce recipe came from Betty Crocker too, but from one of their recipe magazines. (I cut it out & have no idea what the magazine's title was!) The sauce is completely optional. I love it, but my family prefers powdered sugar or syrup.

This is easy & delicious. In fact, my teenage girls did the "night before" prep and my hubby made the fruit sauce the next day. Enjoy!

Overnight French Toast Bake with Berry Sauce
Prep Time: 20 minutes
Start to Finish: 4 hours 50 minutes minimum
Servings: 8

French Toast Bake:
12 cups cubed (1 inch) soft French bread (about 13 ozs) - I used a french loaf from my grocery store - do not use the ends of the loaf
8 eggs
3 cups half-and-half (you could use plain milk, but it's soggier after you bake it & not as rich)
1/4 cup sugar
1 tsp cinnamon (I double this because we love cinnamon!)
1/2 tsp salt
2 tsp vanilla

Berry Sauce:
1 cup sugar
1 Tbsp cornstarch
1/4 cup orange juice
1 12oz bag frozen unsweetened mixed berries
3 cups fresh strawberries, cut into quarters (or just use your favorite berry like raspberry, blackberry, etc)

  • Spray bottom & sides of 13x9" (3 quart) baking dish with cooking spray. Place bread cubes in baking dish.

  • In large bowl, beat eggs, half-and-half, 1/4 cup sugar, cinnamon, salt & vanilla with wire whisk until smooth. Pour mixture over bread cubes. Press cubes lightly into egg mixture & turn over any pieces that are still dry on one side. You want each bread cube to be coated with the egg mixture.


  • Cover tightly; refrigerate at least 4 hours but no longer than 24 hours. I like to do this before I go to bed & bake it first thing in the morning.


  • Preheat oven to 400*F.

  • Uncover dish; bake 25-35 minutes or until golden brown and knife inserted in center comes out clean.


  • While French Toast Bake is baking: In 2-quart saucepan, stir together 1 cup sugar and cornstarch. Stir in orange juice until smooth. Stir in mixed berries.

  • Heat to boiling over medium heat, stirring constantly.

  • Cook about 6 minutes, stirring constantly, until topping is slightly thickened. Remove from heat.

  • Just before serving, stir strawberries (or your favorite berry) into topping. Serve warm over French Toast Bake.


Because I'm allergic to strawberries, we used raspberries in our berry sauce - YUM!!

This berry sauce is so good over cake!! Pound cake, angel food cake & chocolate cake are our favorites. It freezes well too. I pour it into a ziplock bag after it has cooled & seal it tightly. It stays good in your freezer up to 3 months.

The French Toast Bake is delicious with syrup and powdered sugar, but if you have a good powered sugar glaze recipe that is amazing too! We like this as a side for eggs too.


Wednesday, March 30, 2011

Betty Crocker's Cupcake Poppers


Have you seen these from Betty Crocker?? They're SO CUTE and super easy!! You can do any color for any occasion. Just awesome :)

Friday, March 18, 2011

Quick-n-Easy Shepherd's Pie


Don't let the green mashed potatoes freak you out - I made this for our St. Patrick's Day dinner last night. :) Obviously, you can make this with regular white mashed potatoes on top for everyday.

This was quick-n-easy, delicious & filling. YUM!!

Quick-n-Easy Shepherd's Pie
Serves 4 adapted from recipe found in Real Simple Magazine

1 lb ground turkey (or beef, if you prefer)
1/3 cup ketchup
1 tsp Worcestershire sauce
8 ozs frozen mixed vegetables, thawed (I used a peas/corn/carrots/green beans mix)
1/4 cup (1 oz) shredded Cheddar cheese
3 cups prepared mashed potatoes OR 1 16-oz pkg refrigerated or frozen & thawed mashed potatoes

  • Preheat oven to 400*F
  • Place meat in large skillet & cook over medium-high heat until no trace of pink remains, about 5 minutes. Spoon off/discard any fat.
  • Stir in ketchup & Worcestershire thoroughly. Add vegetables. Cook, stirring, for 1 minute.
  • Spoon meat/veg mixture into a 2 quart baking dish. Sprinkle cheese over meat/veg mixture. Spread mashed potatoes over the top.
  • Bake 10-15 minutes, or until heated through.

You can also serve this in individual baking dishes.

For St. Patrick's Day, I added 5 drops each green & yellow food coloring to the water before preparing my instant mashed potatoes. To keep the green theme going, we paired this with "Leprechaun" Lemonade (tinted green w/food coloring) and a green salad.

Enjoy!


Wednesday, February 23, 2011

Chocolate Birds Nests - by Thanksgiving Point Emporium Kitchen


OMGosh!! How cute are these?!?!? I can't wait to make these for Easter!!

Recipe from Thanksgiving Point, Emporium Kitchen.


Chocolate Birds Nests

Makes 5 large or 10 small


* 5 oz. crunchy chow mein noodles (1 small can)
* 1 c. chocolate chips (½ a bag)
* 1 tsp. vegetable shortening
* Candy eggs (medium-sized speckled jelly-beans, or Cadbury Mini-Eggs in Easter pastels work nicely)


Line a baking sheet with aluminum foil or parchment paper. Melt the chocolate and shortening together in a microwave or over a double boiler, stirring until melted. Allow to cool slightly, but do not let it set up. Stir in the chow mein noodles until evenly coated. Drop the coated noodles onto the baking sheet with a large spoon. For 5 large nests, form into circle about the size of an adult palm or half that amount for 10 small. Use your fingers to sculpt the noodles into a round shape and to form an indentation in the middle of the nest. Place eggs in the nest while chocolate is still wet. Place nests in the refrigerator to harden.


We're linked up with Sweet As Sugar Cookies!

LinkWithin

Related Posts with Thumbnails