Wednesday, October 30, 2013

Lemony Herb Pasta with Chicken, Broccoli & Bacon


I clipped the original recipe for this dinner from a magazine years ago.  I can't even remember which one!  I've hung onto it for awhile but haven't ever made it - BIG mistake.
It's so YUMMY!
I decided to make a few adjustments to fit our family's tastes and the final result was perfect!
Creamy, lemony, slightly cheesy & bacon-y - everything a pasta dinner should be.
I hope you love it as much as we did.


Lemony Herb Pasta with Chicken, Broccoli & Bacon
Serves 6-8
 
4 slices bacon
2 cups chicken, cooked & cut into bite-size chunks
1 15-oz container part-skim ricotta cheese
5 Tblsp lemon juice
2 tsp lemon zest
1/4 cup grated Parmesan cheese
1/3 cup chopped parsley (or 2 Tblsp dried parsley)
1 Tblsp olive oil
1/2 - 1 tsp salt (to your taste - start with 1/2 tsp & add more at the end, if needed)
1/4 tsp black pepper
1 pound (16 oz) penne pasta
1 pound broccoli, cut into 1 inch pieces

  • Cook bacon until crispy, crumble & set aside.  Save leftover bacon grease in skillet (you'll heat up the cooked chicken in this skillet).
  • Bring a large pot of water to a boil.
  • In a small bowl, whisk together ricotta, lemon juice, lemon zest, Parmesan, parsley, olive oil, salt & pepper.  Set aside.
  • Add penne to boiling water & cook for about 7 minutes or until tender.  Add broccoli to pot for the final 3 minutes of cooking time.
  • While penne is cooking, heat the same skillet you used for the bacon to medium-medium high.  Add cooked, cubed chicken.  Stir to coat with bacon grease.  Leave in skillet until warmed thoroughly, stirring occasionally.
  • When penne & broccoli are done, reserve 1 cup pasta water.  Set aside.
  • Drain pasta/broccoli & place in large serving bowl.
  • Add ricotta mixture to serving bowl with pasta/broccoli.  Stir well.
  • Add heated chicken & crumbled bacon to serving bowl.  Stir well to combine.  Add reserved pasta water by 1/4 cupful if necessary (to increase the creaminess of the cheese mixture - you may not need any pasta water at all).
  • Serve immediately.
We served this with garlic bread.

Enjoy!!

Kathryn

Monday, July 29, 2013

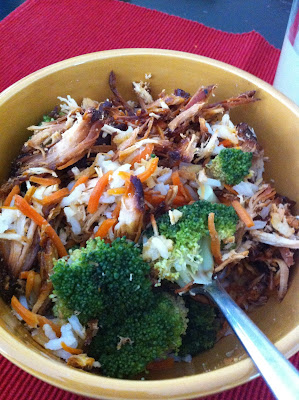
Chicken Rice Bowls (Rumbi-style)


I had a few inspirations that drove the creation of this recipe.

First, we have a local restaurant that we love, but can't always afford - isn't that always how life goes?!  It's called Rumbi Island Grill.  One of our favorites is their chicken rice bowls.
(pictured below - 2 photos courtesy of rumbi.com)


Looks yummy, right?!?
Second inspiration - During the hot summertime, I love to serve meals that are light, fresh, and don't heat up my kitchen too much during preparation.

Third, I always like to find ways to re-create our favorite meals at home for much less money.

SO - This meal uses a slow cooker for the chicken and you whip up the veggies and rice just before serving -probably 15 minutes cooking, tops!  Plus, if I'm shopping sales, I can make this meal for about $12 for my family of 6 adults and teens.  And it feeds our Rumbi cravings too - It's perfect.

I found the recipe for the chicken portion of this meal on Pinterest.  The link (http://www.sixsistersstuff.com/2012/07/slow-cooker-garlic-and-brown-sugar.html) took me to Six Sisters' Stuff - LOVE their blog!

The chicken recipe immediately reminded me of Rumbi - YAY! - When my family started making the yummy noises, I knew I had a winner.

Enjoy!


Chicken Rice Bowls - Rumbi-style

Chicken recipe from sixsistersstuff.com (link above)
Inspiration from Rumbi Island Grill

4-6 chicken breasts or thighs (frozen or thawed)
1 cup packed brown sugar
2/3 cup vinegar
1/4 cup lemon-lime soda (I double the soda to 1/2 cup)
2 Tblsp soy sauce
2-3 Tblsp minced garlic
1 tsp pepper
2 Tblsp cornstarch
2 Tblsp water
4-6 cups prepared long grain rice - white or brown - follow package directions
2-3 cups broccoli florets, steamed
1 cup shredded/julienned carrots

  • Spray slow cooker with non-stick cooking spray.
  • Place chicken inside slow cooker. (Six Sisters' Stuff used frozen chicken, I used thawed chicken)
  • Mix together brown sugar, vinegar, soda, garlic, soy sauce, and pepper. Pour over chicken in slow cooker.
  • Cook on low for 6-8 hours or high for 4-5 hours, if using frozen chicken. For thawed chicken, cook on low 5-6 hours, on high for about 4 hours.

Before serving:
Prepare rice (according to package directions) and steam/boil your veggies.  We like broccoli & shredded carrots (throw the carrots in with the broccoli for the last 1 minute of cooking), but you can pick your favorite veggies here (zucchini, snow peas, stir fry mix, etc)

  • Take chicken pieces out of slow cooker and lightly shred in a bowl.  Set aside.
  • Pour remaining sauce from slow cooker into saucepan.
  • Place saucepan over high heat.
  • Mix together corn starch and water, pour into saucepan, and mix well.
  • Let sauce come to a boil and boil for 2-3 minutes, or until it starts to thicken and turns into a glaze.  You'll need to watch the sauce and whisk it occasionally.
  • Remove from heat and let sit for a minute or two (it will continue to thicken as it cools down).

    ** I often make an additional recipe of the glaze (because it's YUMMY!)
    ** Mix together the quantities noted in the ingredients list of brown sugar, vinegar, soda, garlic, soy sauce, and pepper. Pour into saucepan.  Follow the sauce directions above.

We like to serve this buffet-style, but you could build the rice bowls before bringing them to the table.  Rice in first, followed by veggies, top with shredded chicken & drizzle with sauce.

Oh my goodness, these are yummy!!  Leftovers keep well for a day or two, but I doubt you'll have any.

Kathryn


Friday, June 28, 2013

Banana Bread


Banana Bread
1 cup butter, margarine or shortening
2 cups sugar
4 well beaten eggs
5 bananas (liquified in blender)
3 1/2 cups flour
2 tsp baking soda
1 tsp salt

Cream shortening and sugar.  Add well beaten eggs.  In a separate bowl, combine flour, salt and soda.  In a blender add bananas and blend until they are liquified.  Alternately add the flour mixture and the bananas to the creamed mixture.  Pour the batter into 4 small loaf pans or 2 larger pans.

Bake at 300 degrees for 25 minutes approximately for smaller loaf pans, and 50 minutes for larger loaf pans.

Friday, February 8, 2013

Cheesy Italian Shredded Beef Sandwiches


These were SOOO good!!  Best of all - this meal requires very little effort (your slow cooker does most of the work) and yields an awesome result!  A few minutes in the morning and about 10 minutes right before dinner is all you'll need.  Just add a green salad & you're good to go.  Enjoy!


Cheesy Italian Shredded Beef Sandwiches
Prep time:  10 minutes
Total time:  (including slow-cooking time)  6-8 hours 10 minutes
Servings:  12 sandwiches

boneless beef chuck roast, about 3 lbs total - I used 2 small 1.5 lb roasts
1 medium yellow/white onion, sliced
1 0.6oz Italian salad dressing seasoning packet
1 1/2 cans (14.5 oz) beef broth (I prefer low-sodium)
1/2 cup grated parmesan cheese
12 slices provolone or mozzarella cheese
12 large ranch rolls (HB bun size but not HB buns!) or ciabatta rolls

Turn slow cooker on LOW.  

Pour in 1 can beef broth.  Place roast in slow cooker.  Sprinkle 1/2 Italian salad dressing seasoning packet over roast.  Tumble sliced onions over top of roast.  Mix remaining Italian salad dressing seasonings with remaining 1/2 can beef broth and pour over roast & onions.

Cook on LOW 6-8 hours or on HIGH 4-5 hours.

To serve: 
Preheat broiler.

Remove meat & onions from slow cooker to a medium-size bowl.  If you don't like the onions, you can throw them away.  I like to keep them in a separate bowl & top the sandwiches with them.  (Well, my sandwich since the family doesn't like cooked onions - lol!)  Set aside.

Pour liquid in crock pot through a sieve into at least a 4 cup glass measuring cup (preferrably one that pours the broth from the bottom & leaves the oils on top behind in the measuring cup). 

Discard contents of sieve.  Pour 1 1/2 cups broth back into crock pot.  Discard excess liquid & oils.

Shred meat with forks & return to slow cooker with broth.  Stir in parmesan cheese until all cheese & liquid is combined with the meat.

Place bottom halves of rolls on a foil-covered baking sheet.  Distribute meat/cheese mixture evenly between all 12 rolls.  Top each with 1 slice provolone cheese.  Place under broiler until cheese is melted & lightly browned (just 1-2 minutes).  Top with top halves of rolls.  Serve immediately.

OPTIONAL:  
If you like roasted peppers:

1 16oz jar roasted red peppers, undrained (optional)

Only use 1 can beef broth in bottom of slow cooker.  Top seasoned roast with roasted peppers & sliced onions.  Mix remaining Italian salad dressing seasonings with roasted peppers liquid from the jar.  Pour liquid/seasonings mixture over roast/peppers/onions.

Reserve peppers & onions from sieve.  Top meat/cheese mixture with peppers & onions before topping with provolone cheese -  OR - stir peppers & onions into shredded meat along with parmesan cheese.  Continue with recipe as noted above.


This recipe was inspired by this one at kraftrecipes.com.

Hope you love it too!

Kathryn

Wednesday, January 30, 2013

Cheesy Bacon & Onion Monkey Bread


Do you like monkey bread?  We do - A LOT!  Normally, it's full of buttery cinnamony-sugary goodness and absolutely delicious!

What do you think of monkey bread smothered with cheese & dotted with bits of bacon and green onion??  We weren't sure what to think, but after making this recipe last night - we can say we think it's YUMMM!!

We paired this with our favorite cheesy bratwursts & chicken/apple sausages and a big green salad.


Cheesy Monkey Bread
adapted from a recipe found at kraftrecipes.com
Prep:  15 mins
Total time:  45 mins
Serves 12

2 slices bacon, cooked & crumbled
2 packages (11.3oz each) refrigerated dinner rolls
1 pkg (8 oz) shredded cheddar cheese
3 green onions, chopped


Preheat oven to 350*F.  Lightly grease/spray with cooking spray a 9" deep pie pan.

Separate rolls; cut each into quarters.  (Much easier with kitchen scissors)

Layer half each of the dough pieces & cheese in prepared pie plate.  Sprinkle with half the cooked/crumbled bacon.

Cover with remaining dough pieces and bacon.  (As you can see from the picture below, we didn't follow this direction well...  We should have.)


Bake 25-30 mins or until golden brown.

Top with remaining cheese.  Bake 3 mins or until cheese is melted.

Transfer to a serving plate/platter (or a small cutting board) to serve.  Sprinkle with green onions before serving.

NOTE:  It's easier to cut pieces (like a pie) & serve them than to pull this apart.  But if you want to pull it apart, go for it.  Just know - it's messy!


Changes for next time:
We will definitely follow the directions correctly next time.  We sprinkled the onions between the layers and on top before baking.  The crisp of the cool green onions on top would've been much better than cooking them inside.  I also think the rolls would've browned better if they didn't have the cheese & onions on top before baking (the original directions called for them to added afterwards or at the end).

Another change request from my kids - more bacon!  I'll probably double the amount next time.

I think a dipping sauce or drizzle would be good too.

There are variations for Mexican-style, Italian-style, and Caramelized Onion-Rosemary monkey breads on kraftrecipes.com - be sure to check those out too.  They sound yummy!

Enjoy!

Kathryn

Thursday, January 24, 2013

Creamy Lemon-Garlic Chicken

How can you go wrong with chicken, lightly floured & browned, simmered in a creamy lemon-garlic sauce, and poured over whole grain pasta & fresh-steamed broccoli?!?  It's dreamy-delicious!


It all started with this recipe for Lemon Chicken with Capers that my family LOVES and it crazy-close to a dish we love at Bucca di Beppo.  I'd wanted to do a creamy, similar version, but hadn't gotten around to it...

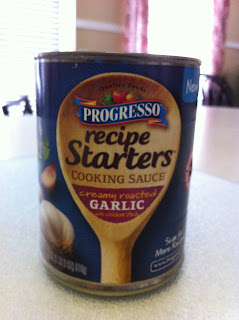
Then I got an email with a free coupon for this:


Have you seen these?  They come in all kinds of flavors (tomato, cheese, creamy basil, etc).  I know some people aren't into processed foods, especially sauces.  But I was pleased with the low carb count (for my Type 1 diabetic son) and the quick-and-easy part really appealed to me.  I think from-scratch is always best, but you can't beat these in a pinch!   And it was FREE.  Double-good.

I decided to go to BettyCrocker.com to see what kinds of recipes they had for these Recipe Starters before picking one up...

I found Creamy Lemon Chicken, made a couple of small adjustments, and it became my Creamy Lemon-Garlic Chicken.  Hope you like it!


Creamy Lemon-Garlic Chicken
Prep time: 10 minutes
Total time:  30 minutes
Serves: 4

1/4 cup all-purpose flour
1 tsp salt
1/2 tsp pepper
2 Tblsp vegetable oil
4 thin-cut boneless, skinless chicken breasts (see note below)
1 can (18 oz) Progresso Recipe Starters creamy roasted garlic with chicken stock cooking sauce
3 Tblsp lemon juice
1 8oz package whole grain angel hair pasta
2 cups fresh broccoli florets
optional toppings:  chopped fresh parsley, grated lemon peel

1.  Mix flour, salt & pepper together in a medium-sized bowl.  In a large skillet, preheat 2 Tblsp vegetable oil over medium-high heat. 

2.  Dip each chicken breast into flour mixture, coating both sides.  Shake off excess flour & place chicken breast in skillet.  (You can cook more than one chicken breast at a time.)  Cook chicken breasts in oil 6-8 minutes, turning once, or until brown.  **Note:  If you're doubling this recipe, like I did, you can get 2 skillets going at the same time.  When the chicken is done, move it to a plate & cover with foil until you add the sauce to the chicken in Step 3.)

3.  In a small bowl, mix cooking sauce & lemon juice.  Place all the cooked chicken breasts back into the skillet, turn heat to medium-low.  Pour sauce/lemon juice mixture over the chicken.  Simmer 5-10 minutes or until jice of chicken is clear when center of thickestpart is cut (at least 165*F).

4.  While chicken & sauce are simmering, cook broccoli florets & pasta together in a large pot of boiling water, according to pasta package directions.

5.  Drain pasta & broccoli well.  Pour onto large serving platter or into large serving bowl.  Pour chicken & sauce over the top.

6.  Optional toppings:  chopped fresh parsley and/or grated lemon peel

NOTE:  You don't have to buy thin-cut boneless skinless chicken breasts, but it sure makes this recipe go faster & easier!!  If you have regular chicken breasts, place each chicken breast, smooth side down, between pieces of plastic wrap or waxed paper.  Gently pound with flat side of meat mallet or rolling pin until about 1/2 inch thick.  Follow recipe as directed above.


BettyCrocker.com recommended this be served over rice.  I liked the idea of pasta better, but if you're into the rice - go for it!

Enjoy!

LinkWithin

Related Posts with Thumbnails