Showing posts with label appetizer. Show all posts

Friday, May 11, 2012

Vegetable Pizza Appetizer


**I had to come up with some kind of vegetable dish to take to a funeral yesterday.  I decided to do this recipe since it has so many fresh cut vegetables.  This was a recipe I remember from a Pampered Chef party years ago, but they always use dill to make theirs.  I'm not a lover of dill, so I use ranch.  I made  a second one for our family also, but added some grilled chicken as well.  It was DE-Lish!**


Vegetable Pizza Appetizer
1 Pkg.  Pillsbury Crescent Rolls
1 8oz cream cheese
1 packet Ranch Dressing powder
3 cups of your favorite vegetables chopped up  (I use broccoli, cauliflower, carrots and red peppers)
**As an option, I had some grilled chicken in the freezer that I heated up, cut into cubes and added to the vegetables as well**

Press the pkg of crescent rolls into the botton of a 9x13 baking dish.  Bake at 350 degrees for about 10 minutes or until lightly golden brown.  Let cool.

In a small bowl, combine the cream cheese and ranch packet.  Stir until it is all mixed in well.  Spread this over top of the cooked and cooled crescent rolls.

Chop your vegetables up into small pieces.  Put them all into a bowl to mix them together well.  If you are adding chicken, do so at this point too, so it is all evenly mixed together.

Pour this vegetable mixture over top of the cream cheese.  You can then serve immediately just like this, OR I added about 1/2 cup of grated cheddar cheese that was evenly distributed over top of the vegetables, and then I baked it in a 350 degree oven for 5 minutes.  I only did this because I thought it would help keep it all together better.

It really was DELISH.  Enjoy.

Monday, March 26, 2012

Parmesan Roasted Potatoes


This side-dish was super easy & extra delicious! I will definitely be making this again & again & again...

We paired this with chicken sausages, but you could absolutely use this side dish with almost anything! I had it the next day with some broccoli & it was delish.

Enjoy!

Parmesan Roasted Potatoes
Hands-on time: 10 mins - Total time: 1 hour
Makes 4 servings

1 1/2 pounds red potatoes, cut into 1" chunks
3 Tblsp olive oil
1 1/2 tsp kosher salt
1/4 tsp black pepper
1 cup (4 oz) grated Parmesan cheese
1/2 tsp dried thyme (or 8 fresh sprigs)

Preheat oven to 400*F.

In a medium bowl, combine all ingredients. Transfer to a lightly greased (or foil-lined & lightly greased) 9x13" baking dish.

Roast, stirring once, until golden brown & crisp - about 50 minutes.

Can be served hot or at room temperature.

Wednesday, October 12, 2011

Mac-n-Cheese Muffins


Aren't these cute?!? I love the idea of having this cute little side dish on my family's plates. :) Plus, perfect portion control!

I found the idea for these on Betty Crocker's website (link here) but I didn't like their actual recipe. So I decided to post the technique & let you use your own Mac-n-Cheese recipe. Even a box of Kraft Mac-n-Cheese would be fun for this recipe!

A couple of notes:
The meat is not necessary for this recipe. You can omit it altogether, or change it to something else. Ideas: chicken, Italian sausage, ham or crumbled bacon, kidney beans, or veggies (like broccoli).

If you're cooking this as a meal, I'd definitely add something to it. As a side dish, it's fine all by itself.

I was thinking you could cook most pasta recipes this way... Might be fun to put down a couple of these muffins using a marinara-based dish (like baked ziti?) and a big salad plus garlic bread for dinner!

I also think they would be a cute appetizer or snack!

Get creative & enjoy!


Mac-n-Cheese Muffins
adapted from Cooking With Sugar's recipe on BettyCrocker.com

Your favorite recipe for Mac-n-Cheese (here's mine)
1 cup (4 oz) finely shredded cheese
(pick a cheese that reflects the flavors in your mac-n-cheese recipe - Cheddar,
Monterey Jack or Pepper Jack for basic mac-n-cheese, Italian cheese for Italian
mac-n-cheese, etc)
1/2 cup Italian-style panko crispy bread crumbs

If adding meat: 1/2 lb ground meat/sausage


Heat oven to 350*F. Spray 12 regular-sized muffin cups with cooking spray; set aside.

Prepare your favorite Mac-n-Cheese recipe.

If using ground meat, brown it thoroughly & drain, if necessary.

Fill each muffin cup with Mac-n-Cheese. If using them, sprinkle add-ins (like meat, beans, veggies) over the top.

Sprinkle bread crumbs & shredded cheese over top.


Cover pan loosely with foil, making sure foil does not touch cheese. Bake 15 minutes.

Remove foil; continue baking for 5 minutes more to brown mac-n-cheese muffin tops.

Remove from oven. Cool at least 10 minutes before removing muffins from pan.


Recipe note on BettyCrocker.com:
Muffins will still be wet when first removed from the oven. But once they cool, they are easy to remove from the pan with a small metal spatula.


Friday, July 1, 2011

Independence Day Treats - a little inspiration

When Independence Day rolls around, I think we've all made a flag cake with berries for the stars & stripes, or dyed our pancakes red & blue, or decorated sugar cookies, or made cupcakes...

Sometimes it can feel redundant. Most times, I'm looking for something new to jazz up our festivities.

This year, I found a couple of things I think you might like - a little inspiration...


These skewers are adorable! Perfect for little hands at an Independence Day party. You can find them (and more!) at Sisters Stuff.


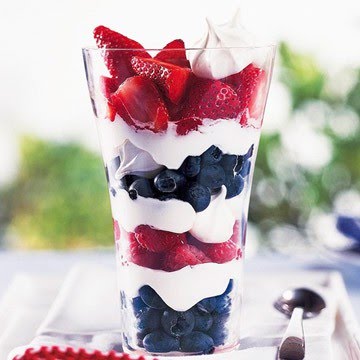
It's an oldy-but-goody, and it sure looks beautiful. I like to add granola to my fruit & yogurt parfaits. Theses are great for an Independence Day breakfast or snack. Much lighter than pancakes! (Though I do love me some pancakes!)


This one is adorable! What a great way to display breakfast muffins or cupcakes or mini-cheesecakes - anything, really.

The big splash is the topper, for me. Love another way to display a flag at the buffet table.


Finally, our traditional dessert while we watch the fireworks on Independence Day - Indoor S'mores.

They're AMAZING! :)

Happy Independence Day, everyone!

Enjoy!


Saturday, February 26, 2011

Friday Night Nachos


It was Movie Night at our house last night & what could be better to go with a movie than Nachos?!?


This recipe came from Family Circle Magazine, Jan 2010. They were delicious!! Ooey & gooey, just like nachos should be.


I made them 2 ways - with shredded chicken and with shredded pork. I used canned chicken from my food storage since I didn't have any fresh shredded chicken on-hand. I had some in my freezer, but forgot to take it out to defrost.

The canned chicken was really good after I drained & rinsed it, then browned it up just a touch in a non-stick skillet. No oil, just the chicken. It browned up & dried out just a bit so it was perfect on the nachos.

The pork was a refrigerated, pre-prepared product by Hormel. It's called Pork Roast au Jus. No extra seasonings, just yummy pork roast. You pop it into the microwave for 4 minutes, let it sit for 2 more, and then shred it with a fork. Super good!

Other options:
Make these with 1/2 pound coarsely chopped cooked shrimp and 1 8oz can drained crushed pineapple instead of chicken or pork. We're definitely trying that next time!

I think you could also used shredded beef (taco flavored or plain) or some ground beef or turkey browned & seasoned with taco seasonings. Meatless would be great too. Just increase the beans, if desired.

Friday Night Nachos
serves 6 Prep time: 10 minutes

6 ozs baked tortilla chips
2 cups (8 ounces) cooked shredded chicken or pork (or your favorite, see notes above)
1 15oz can black beans, drained & rinsed (you could also use pinto beans, drained & rinsed)
1 cup jarred salsa
1 cup shredded Mexican cheese blend
4 scallions (green onions), trimmed and thinly sliced


  • Heat oven to 350*F
  • Pour tortillas chips into 9x13x2" baking dish. Spread evenly.
  • Scatter chicken (or your choice of meat) and black beans over chips.
  • Spoon salsa over beans/meat and top with cheese & scallions.
  • Bake for 15-20 minutes, until heated through and cheese is melted.
  • Serve immediately.

Per serving: 282 calories; 6g fat (2g sat.); 19g protein; 37g carbohydrate; 6g fiber; 686mg sodium; 35mg cholesterol


Tuesday, June 29, 2010

Bruschetta Appetizer


**Here are pictures of the ingredients we used, a plate of them made just fresh, and a plate where we added avocado to them (Yum), and some that were cooked under the broiler.**


This was a yummy lunch on a hot day. Above is a picture of the ingredients you need. The only thing we did was add a layer of regular salsa that has more liquid first.


So, get out your piece of bread. Spread a think layer of salsa. Then put a spoonful of the chunky salsa on top of that. Then top with some parmesan cheese.


We ate them cold, just like this. You can put them under the broiler if you want and they will be yummy that way too, but why heat up your house.

LinkWithin

Related Posts with Thumbnails